
Do you want to start a new garden or improve an existing one? If so, you might need to dig a garden bed. Do you know how to dig a garden bed?
No? Well, don’t worry! We are here to help you how to dig garden bed.
Digging a garden bed is a process of preparing the soil for planting by removing the grass, loosening the soil, and adding organic matter. By digging a garden bed, you can improve the soil quality, drainage, and plant growth of your garden.
In this blog post, We will show you how to dig a garden bed by hand in seven easy steps.
Whether you want to grow vegetables, flowers, or herbs, digging a garden bed can help you create a healthy and beautiful garden.👩🌾🌱
Contents
7 Easy Steps to Dig a Garden
1. Mark Out Your Garden Site
The first step to digging a garden bed is to mark out your home garden site. For that, you need to choose a suitable location and shape for your garden bed. Also, consider factors such as sunlight, water, and aesthetics. You want to pick a spot that gets enough sun for your plants, has access to water, and fits well with your landscape design. Plus, you can also get creative with the shape of your home garden bed, making it curved, rectangular, or any other shape you like.

Furthermore, to mark out your garden site, you can use a hose, string, or spray paint to outline the edges of your bed. You can also use stakes or flags to mark the corners. Make sure you measure the dimensions of your bed and adjust them as needed because you don’t want to make your bed too big or too small for your plants.
Before you start digging, you should also call your local utility companies and get your yard marked for any underground wires or pipes. As you don’t want to accidentally damage them or hurt yourself while digging.👩🌾🌱
2. Remove the Sod Layer
The next step to digging a garden bed is to remove the sod layer. The sod layer is the top layer of grass and roots that covers the soil. You need to remove it to prevent weeds from growing in your garden, and to improve the soil quality. There are different ways of removing the sod layer, depending on how much time and effort you want to spend.

One way of removing the sod layer is to dig it up with a spade or sod cutter. This method is fast and effective, but it can also be tiring and wasteful. You have to dig up the entire sod layer and dispose of it or reuse it for other projects. In addition, you can also compost it, use it for erosion control, or donate it to someone who needs it.
Another way of removing the sod layer is to smother it with newspaper and compost. This method is slower but easier and more eco-friendly. For that, you have to cover the entire sod layer with several layers of newspaper and then add several inches of compost on top. The newspaper and compost will block the sunlight and kill the grass over time. This method can take several weeks or months, depending on the season and climate.
3. Dig Out the Soil
The third step to digging a garden bed is to dig out the soil from the marked area using a spade or shovel. You need to dig out the soil to loosen it and remove any rocks, roots, or debris that might hinder your plants’ growth. You also need to dig deep enough for your plant’s roots to spread comfortably.
The depth of your digging depends on the type of plants you want to grow and the quality of your soil. Generally speaking, you should dig at least 12 inches deep for most plants. However, some plants might need deeper or shallower soil than others. For instance, carrots need deep soil while lettuce needs shallow soil.

As you dig out the soil, you should also add organic matter to enrich it and improve its texture and drainage. Organic matter is any natural material that decomposes in the soil, such as compost, manure, leaves, grass clippings, or straw. Additionally, organic matter provides nutrients for your plants and helps retain moisture and air in the soil.
To add organic matter to your soil, you can either mix it with the soil as you dig it out or spread it on top of the dug-out soil. You should aim for about 25% organic matter in your soil.
4. Loosen the Bottom Layer
The fourth step to digging a garden bed is to loosen the bottom layer of soil that you dug out in step 3. This step is also known as double digging because you are digging twice: once to remove the top layer of soil and once to loosen the bottom layer. By loosening the bottom layer, you are creating a well-drained and aerated garden bed with deep and loose soil. This allows your plants’ roots to thrive and grow bigger and more vigorously.
To loosen the bottom layer, you need to use a garden fork to break up the soil at the bottom of each trench you dug in Step 3. You should insert the fork as deep as possible and wiggle it back and forth to loosen the soil. You should also remove any rocks or roots that you find in the bottom layer.
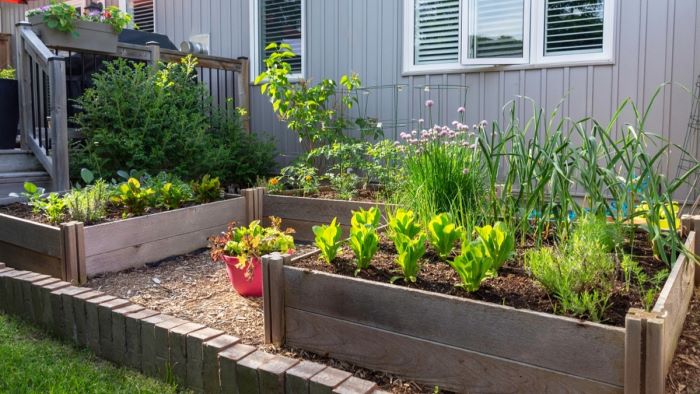
5. Edge Your New Garden Bed
Now, it’s time to edge your new bed. Edging your bed means creating a border around it to keep the lawn from invading your garden, and to create a neat and tidy appearance. Edging your bed can also help prevent soil erosion and water runoff.
There are different edging materials that you can use for your bed, depending on your budget, style, and preference. Some of the most common edging materials are metal, plastic, wood, stone, brick, or plants. Each material has its own advantages and disadvantages in terms of cost, durability, maintenance, and aesthetics.
To install edging around your bed, you need to dig a trench around your bed and place your chosen material along the edge. The trench should be about 8 inches deep and 2 inches wide. You should also make sure that the edging material is level with the ground or slightly higher than it.
6. Site Your Plants
The sixth step to digging a garden bed is to site your plants. Siting your plants means planning your plant layout according to their size, shape, color, bloom time, and growing requirements. You want to arrange your plants in a way that maximizes their beauty and health.

To site your plants, you can use pots or markers to place your plants before you put them in the ground. This will help you get the spacing and arrangement right. You can also draw a sketch of your plant layout on paper or use an online tool to visualize it.
When sitting your plants, you should consider some basic principles of garden design, such as balance, contrast, harmony, repetition, and focal point. You should also choose plants that are suitable for your climate, soil type, and personal preference.
7. Now Plant Your Plants
The final step to digging a garden bed is to plant your plants in the ground. It is the most rewarding part of digging a garden bed because you can finally see your vision come to life.
To plant your plants in the ground, you need to dig holes that are slightly larger and deeper than their root balls. You should also loosen or tease the roots of your plants before you put them in the ground, especially if they are root bound. Root bound means that the roots have grown too much for their container and have formed a tight mass around it.

You should also water your plants well after planting them and add mulch around them to conserve moisture and prevent weeds. Mulch is any material that covers the soil surface around your plants, such as wood chips, bark, straw, or leaves. It helps regulate the soil temperature, reduce evaporation, suppress weeds, and add organic matter to the soil.
FAQs
How deep should a garden bed be?
A garden bed should be at least 12 inches deep for most plants. However, some plants might need deeper or shallower soil depending on their root size and growing requirements.
How do you make a simple garden bed?
Simple garden bed can be made by marking out a site, removing the sod layer, digging out the soil, loosening the bottom layer, edging the bed, siting the plants, and planting them.
How to dig a flower bed border?
A flower bed border can be dug by digging a trench around the bed and placing an edging material along the edge. The trench should be about 8 inches deep and 2 inches wide.
How to dig a vegetable garden?
Vegetable garden can be dug by following the same steps as a flower bed, but with a deeper soil depth of 18 inches. You should also add organic matter to the soil and choose suitable plants for your climate and soil type.
Conclusion
Summing up our blog: How to dig a garden bed?
Digging a garden bed by hand is not an easy task, but it is worth it. By following these seven steps, you can create a healthy and beautiful garden bed that will enhance your landscape and provide you with fresh produce or flowers. Digging a garden bed by hand is also a great way to exercise your body and mind and connect with nature.
We hope this blog post has helped you learn how to dig a garden bed by hand. If you have any questions or feedback, please leave them in the comments below.
Thank you for reading!

Hi, I’m Jacqueline, the editor-in-chief of cozynest. I have a passion for plants and gardening, also, have a degree in horticulture from the University of California, Davis. I love to share my knowledge and experience with our readers and help them create beautiful and healthy gardens, indoors, and outdoors. I also enjoy experimenting with different plant varieties, designs, and techniques, and learning from other experts in the field. When I’m not working on cozynest, you can find me in my own cozy nest, surrounded by my favorite plants and books.
1 thought on “How to Dig a Garden Bed?”