
Do you love gardening and growing your own food? If so, you might want to know how to save seeds from your own garden to plant next year. Right?
Saving seeds is a great way to save money, and it’s fun and rewarding to see the fruits of your labor from seed to harvest. Today, we will show you how to save seeds from your home garden in five easy steps. We will also share some challenges and tips for saving seeds successfully.
So, by the end of this blog, you will be ready to start your own seed-saving adventure.🌱
Contents
How to Save Seeds From Your Garden to Plant Next Year?
Saving seeds from your garden is a great way to enjoy the fruits of your labor for years to come. Not only will you save money by not having to buy new seeds every season, but you will also preserve the heritage of your plants. Plus, you can share your seeds with other gardeners and create your own varieties.
Now, we will show you how to save seeds from your garden to plant next year, step by step. Let’s get started.
1. Select the Best Plants for Saving Seeds
The first step is to choose the best plants for saving seeds. It is suggested to select plants that are healthy, vigorous, and have desirable traits. For example, you might want to save seeds from plants that have high yields, good flavor, disease resistance, or unique colors.
However, not all plants are suitable for saving seeds. You need to pay attention to the type of variety you are growing. There are three main types of varieties: open-pollinated, hybrid, and genetically modified.

- Open-pollinated varieties are those that are pollinated by natural means. Such as insects, wind, or birds. They produce seeds that will grow into plants, which are similar to their parents.
- Hybrid varieties are those that are created by crossing two different varieties of the same species. They produce seeds, which will grow into plants that are different from their parents. These are not suitable for saving seeds.
- Genetically modified varieties are those that have been altered by inserting genes from other organisms. They produce seeds that may be sterile or unpredictable. These are also not suitable for saving seeds.
To find out what type of variety you are growing, you can check the seed packet or the plant label.
Some easy and reliable crops to save seeds from include beans, peas, lettuce, tomatoes, peppers, and herbs. These crops are mostly self-pollinating, meaning they do not cross with other plants of the same species.🫛🍅🥬
2. Harvest Seeds at the Right Time
The second step in saving seeds is to harvest them at the right time. It is best to harvest the seeds when they are fully mature and ready to disperse. The timing of harvesting depends on the type of crop and the method of seed dispersal. There are two main types of seeds: dry and wet.
Dry seeds are those that are enclosed in pods, husks, or shells that dry and split open when they are mature. For instance, beans, peas, grains, and flowers.
So, to harvest dry seeds, you need to wait until the pods or husks turn brown and brittle on the plant. Then you can either pick them individually or cut the whole plant and hang it upside down in a dry place until the seeds fall out.

On the other hand, wet seeds are those that are embedded in fleshy fruits or vegetables that need to be extracted from the pulp before drying. For instance, tomatoes, cucumbers, melons, and squash.
Basically, to harvest wet seeds, you need to wait until the fruits or vegetables are fully ripe and soft on the plant. Then you can cut them open and scoop out the seeds along with the pulp.
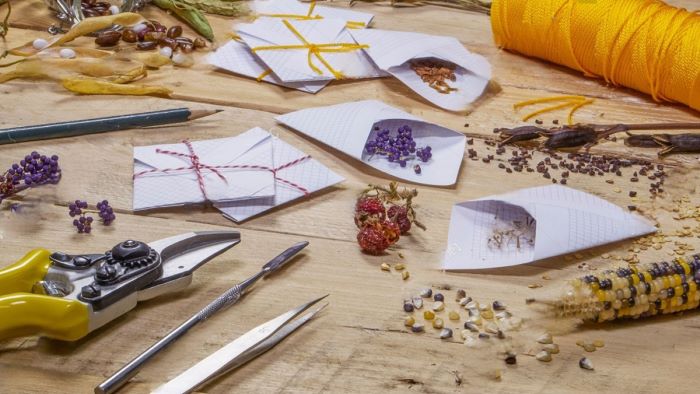
3. Clean and Dry Seeds Properly
Clean the seeds as much as possible to prevent mold and diseases. The method of cleaning depends on the type of seed. For dry seeds, you can use various methods such as winnowing, screening, or threshing.
On the other hand, for wet seeds, you need to wash them with water to remove the pulp and any sticky substances. Some wet seeds also need to be fermented before washing them. Well, fermenting is a process of soaking the seeds in water for a few days until a layer of mold forms on the surface. This helps to break down the pulp and kill any pathogens.
After cleaning the seeds, you need to dry them thoroughly before storing them. For that, you can use various methods such as paper towels, screens, or dehydrators. You should avoid direct sunlight or heat sources, as they can damage the seeds.
4. Store Seeds Safely for Longevity From Your Garden
The fourth step in saving seeds is to store them in a way that preserves their viability and quality for future planting. You can store the seeds in a way that protects them from moisture, temperature, light, and oxygen. These factors can affect the seed storage life, which is the length of time that the seeds can remain viable.

The best way to store the seeds is to use airtight containers, such as glass jars, metal cans, or plastic bags. You can also add some silica gel packets or vacuum sealers to reduce the moisture and oxygen levels. We suggest you to use label for the containers with the name, variety, and date of the seeds.
You should also keep the containers in a cool, dark, and dry place. Such as a refrigerator, a freezer, or a basement.🫙
5. Test the Seeds for Germination Rate
To test the seeds for germination rate, you need to follow these steps:
- Count a sample of seeds, such as 10, 20, or 50.
- Soak the seeds in water for a few hours or overnight.
- Place the seeds on a moist medium, such as paper towels, coffee filters, or cotton pads.
- Cover the medium with a plastic bag or a lid to create a humid environment.
- Keep the medium at a suitable temperature, such as 70°F (21°C) for most crops.
- Check the medium daily for any sprouts and remove any moldy or rotten seeds.
- Count the number of sprouted seeds after a week or two.
You can compare your germination rate with the expected rate for that crop. You can find the expected rate on the seed packet or online. If your germination rate is lower than the expected rate, you might want to sow more seeds than usual to compensate for the lower viability.
Conclusion
We hope you have learned something new and useful from this post and that you will try to save seeds from your favorite crops. If you have any questions or comments about saving seeds from your garden, please feel free to leave them below.
We would love to hear from you and see your seed saving results.

Hi, I’m Jacqueline, the editor-in-chief of cozynest. I have a passion for plants and gardening, also, have a degree in horticulture from the University of California, Davis. I love to share my knowledge and experience with our readers and help them create beautiful and healthy gardens, indoors, and outdoors. I also enjoy experimenting with different plant varieties, designs, and techniques, and learning from other experts in the field. When I’m not working on cozynest, you can find me in my own cozy nest, surrounded by my favorite plants and books.